SignalR with SQL server query notification

SignalR ,the push messaging library by Microsoft makes it magically easy to add real-time response to your web application.

A very typical use of push messaging is when you want to notify the user when some data has changed in your DB.

We will,in this post, see how we can achieve this easily by using SignalR in tandem with the Sql Dependency feature of SQL Server. It is truly a match made in heaven.

I will be working in an ASP.Net MVC application here but it can be easily modifed for ASP.Net web forms or Web-API application.

DB is SQL Server 2008R2 Express.

Entity Framework is used for data access.


1. Adding SignalR

Download and install the nuget package Microsoft.AspNet.SignalR.

2. Enabling Notification service

Run the command in SQL Server :

ALTER DATABASE <yourdbname> SET ENABLE_BROKER WITH ROLLBACK IMMEDIATE ;

This will enable the broker for your current working account.

3. Database

EFModel

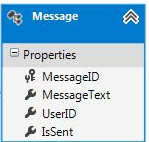
currently has one table “Messages”

Now on to the Code:

4. Enabling SignalR in Application

In your OWIN startup

</p>
using Microsoft.Owin;
using Owin;
using System;
using System.Collections.Generic;
using System.Linq;
using System.Web;
[assembly: OwinStartup(typeof(SignalRTest.StartUp))]
namespace SignalRTest
{
public class StartUp
{
public void Configuration(IAppBuilder app)
{
app.MapSignalR();
}

}
}

5. Readying application to receive notification

First step is to build a query notification link between our application and SQL Server Instance.

For this we will need to enable the SqlDependency in Global.asax


using System;
using System.Collections.Generic;
using System.Data.SqlClient;
using System.Linq;
using System.Web;
using System.Web.Http;
using System.Web.Mvc;
using System.Web.Optimization;
using System.Web.Routing;

namespace SignalRTest
{

public class WebApiApplication : System.Web.HttpApplication
{
//connection string of DB
string connString =  @"Server=.\sqlexpress;Database=testDB;Integrated Security=SSPI";
protected void Application_Start()
{
//regular MVC stuff
AreaRegistration.RegisterAllAreas();
WebApiConfig.Register(GlobalConfiguration.Configuration);
FilterConfig.RegisterGlobalFilters(GlobalFilters.Filters);
RouteConfig.RegisterRoutes(RouteTable.Routes);
BundleConfig.RegisterBundles(BundleTable.Bundles);

//Start SqlDependency with application initialization
SqlDependency.Start(connString);
}
protected void Application_End()
{
//Free the dependency
SqlDependency.Stop(connString);
}

}
}

next we need to inform SQL server about the specific records we want to be notified about.

This would be a simple SQL query. SQL Server will shoot a notification any time result of this query changes.

We do this in the class “NewMessageNotifier


using System;
using System.Collections.Generic;
using System.Linq;
using System.Web;
using System.Configuration;
using System.Data;
using System.Data.SqlClient;

namespace SignalRTest
{
 #region Delegate
 public delegate void ResultChangedEventHandler(object sender, SqlNotificationEventArgs e);
 #endregion
 public class NewMessageNotifier
 {
 #region Fields
 public event ResultChangedEventHandler NewMessage;
 string _connString;
 string _selectQuery;
 #endregion

internal NewMessageNotifier(string connString,string selectQuery)
 {
 _connString = connString;
 _selectQuery = selectQuery;
 RegisterForNotifications();
 }

private void RegisterForNotifications()
 {

 using (var connection = new SqlConnection(_connString))
 {
 using (SqlCommand command = new SqlCommand(_selectQuery, connection))
 {
 command.Notification = null;
 SqlDependency dependency = new SqlDependency(command);
 dependency.OnChange += new OnChangeEventHandler(dependency_OnChange);
 if (connection.State == ConnectionState.Closed)
 connection.Open();
 var reader = command.ExecuteReader();
 }
 }
 }
 private void dependency_OnChange(object sender, SqlNotificationEventArgs e)
 {
 if (NewMessage != null)
 NewMessage(sender, e);
 //subscribe again to notifier
 RegisterForNotifications();
 }
 }
}

We instantiate the above class by passing in the required query and connection string to DB.On every record change the event dependency_OnChange is fired.Inside this we raise an other event called “NewMessage”. Anyone subscribed to “NewMessage” will be notified.

before looking into how we subscribe to “NewMessage” let us first have a look at the SignalR hub class which performs the task of dispatching messages to client.

6. SignalR Hub


using Microsoft.AspNet.SignalR;
using System;
using System.Collections.Generic;
using System.Linq;
using System.Web;

namespace SignalRTest
{

 public class MessageSender : Hub
 {
 public void DispatchToClient(IEnumerable<string> messages)
 {
 foreach (string message in messages)
 Clients.All.broadcastMessage(message);
 }
 public MessageSender()
 {
 Action<IEnumerable<string>> dispatcher = (messages) => { DispatchToClient(messages); };
 //We create a singleton instance of PushMessaging
 PushMessaging.GetInstance(dispatcher);
 }

 }

}

This class is instantiated internally by SignalR library when ever a client connects.

Now, as you might have guessed, we need to make DB change notifier and SignalR message dispatcher talk to each other.
We do this in the class “PushMessaging” .We have created an instance of which above.

since the hub  is re-instantiated on every new request from client we have created a singleton instance of “PushMessaging”.

Now lets have a look at code of  “PushMessaging” where the magic happens

7. Push Messaging


using System;
using System.Collections.Generic;
using System.Configuration;
using System.Data.SqlClient;
using System.Linq;
using System.Text;
using System.Threading.Tasks;

namespace SignalRTest
{
// This class recieves the fresh notifications from DB as forwarded by "NewMessageNotifier".
// It then asks "MessageSender" to disptach messages to client
class PushMessaging
{
static PushMessaging _instance = null;
NewMessageNotifier _newMessageNotifier;
Action<IEnumerable<string>> _dispatcher;
string _connString;
string _selectQuery;

public static PushMessaging GetInstance(Action<IEnumerable<string>> dispatcher)
{
if (_instance == null)
_instance = new PushMessaging(dispatcher);

return _instance;
}
private PushMessaging(Action<IEnumerable<string>> dispatcher)
{
_dispatcher = dispatcher;
_connString = @"Server=.\sqlexpress;Database=testDB;Integrated Security=SSPI";
_selectQuery = @"SELECT [MessageID],[UserID],[MessageText],[IsSent] FROM [dbo].[Messages]";
_newMessageNotifier = new NewMessageNotifier(_connString, _selectQuery);
_newMessageNotifier.NewMessage += NewMessageRecieved;
}

internal void NewMessageRecieved(object sender, SqlNotificationEventArgs e)
{
IEnumerable<Message> newMessages = FetchMessagesFromDb();
_dispatcher(newMessages.Select(lm => lm.MessageText));
using (testDBEntities db = new testDBEntities())
{
//Mark all dispatched messages as sent
newMessages.ToList().ForEach(lm => { db.Messages.Attach(lm); lm.IsSent = true; });
db.SaveChanges();
}
}

private IEnumerable<Message> FetchMessagesFromDb()
{
using (testDBEntities db = new testDBEntities())
{
return db.Messages.Where(lm => lm.IsSent == false).ToList();
}
}
}
}

This class instantiates “NewMessageNotifier” and subscribes to its “NewMessage” event.

When “NewMessage” triggers,it fires the Dispatcher method of  “MessageSender” via Action delegate.


Lastly the MVC view

8. View


@{
ViewBag.Title = "SignalRClient";
}

<div style="padding:10px 0px 10px 10px">
New Messages:
<ul id="messagecontainer">
</ul>
</div>
@section scripts {

<script src="~/Scripts/jquery.signalR-2.0.3.min.js"></script>
<script src="~/signalr/hubs"></script>

<script>
$(function () {
// Reference the auto-generated proxy for the hub.
var clientHub = $.connection.messageSender;
// Create a function that the hub can call back to display messages.
clientHub.client.broadcastMessage = function (message) {
// Add the message to page.
$('#messagecontainer').append('<li>' + message + '</li>');
};
$.connection.hub.start().done();
});

</script>
}

This completes and we can see that any change in DB is reflected in real time on view.

signalr


Before closing, few important points :

1. Query notification service is particular about its queries. See here for details  http://msdn.microsoft.com/library/ms181122.aspx

 2. If you need to grant query notification permission to another account :

GRANT SUBSCRIBE QUERY NOTIFICATIONS TO “domain\user”

and that’s it.Hope you find this post useful.

If you have any suggestion or questions then please pass on to me.


Addendum :

Here is additional set of information for anyone not acquainted with Entity Framework,the DB access layer I have used here.

Microsoft has an excellent step-by-step tutorial which explains implementing EF in a new MVC application.Whole tutorial is great but the below two steps should be sufficient to work with my post :

http://www.asp.net/mvc/tutorials/mvc-5/database-first-development/setting-up-database

http://www.asp.net/mvc/tutorials/mvc-5/database-first-development/creating-the-web-application

If you are following all steps in this post then make sure to name your SQL Server DB as “testDB”and rest should fall in place.

Hope it helps and you have one more addition to your skill set 🙂

OAuth “Implicit Grant” flow with OWIN/Katana

Today we will implement the Implict Grant Flow with OWIN.If you are not familiar with this OAuth flow then please refer here .

First let’s see what the request from client looks like

URL:
http://localhost:1234/api/auth?client_id=123456&redirect_uri=http://localhost:4321/TokenReciever.html&response_type=token
Method:
GET

Unlike the Resource Owner grant flow the parameters here are specified in request URL itself and not POSTed through body of request.

Now on to server side :

1. Required Packages

Same as in previous post on Resource Owner grant flow

2. OWIN Startup Class

Setup is same as stated in previous post but due to how implict flow works,we will not point to token endpoint.We will now point to authorization end point.

Code :

using System;
using System.Collections.Generic;
using System.Linq;
using System.Web;
using Microsoft.Owin;
using Microsoft.Owin.Security.OAuth;
using Owin;

[assembly: OwinStartup(typeof(ImplictOAuthFlow.StartUp))]
namespace ImplictOAuthFlow
{

public class StartUp
 {

public void Configuration(IAppBuilder app)
 {
 app.UseOAuthAuthorizationServer(new OAuthAuthorizationServerOptions
 {
 // the endpoint path which will be consumed via HTTP. e.g. http://website[:port]/api/auth

 AuthorizeEndpointPath = new PathString("/api/auth"),
 //Provider is a class which inherits from OAuthAuthorizationServerProvider.Will be covered next.
 Provider = new CustomAuthServer(),
 // mark true if you are not on https channel
 AllowInsecureHttp = true,

});
 // indicate our intent to use bearer authentication
 app.UseOAuthBearerAuthentication(new OAuthBearerAuthenticationOptions
 {
 AuthenticationType = "Bearer",
 AuthenticationMode = Microsoft.Owin.Security.AuthenticationMode.Active,

});
 }
 }
}

3. Provider class
For Implicit Grant flow we need to override different set of methods.

code :

using System;
using System.Collections.Generic;
using System.Linq;
using System.Text;
using System.Threading.Tasks;
using System.Web;
using Microsoft.Owin.Security.OAuth;

namespace ImplictOAuthFlow
{
 class CustomAuthServer : OAuthAuthorizationServerProvider
 {

public override Task ValidateClientRedirectUri(OAuthValidateClientRedirectUriContext context)
 {
 //We validated that Client Id and Reditect Uri are indeed what we expect
 if (context.ClientId == "123456" && context.RedirectUri.Contains("localhost"))
 context.Validated();
 else
 context.Rejected();

return Task.FromResult<object>(null);
 }

public override Task AuthorizeEndpoint(OAuthAuthorizeEndpointContext context)
 {
 // The authentication types should be set to "Bearer" while setting up the ClaimsIdentity
// I have set up basic mandatory ClaimsIdentity. You can add the necessary claims if required.
 System.Security.Claims.ClaimsIdentity ci = new System.Security.Claims.ClaimsIdentity("Bearer");
 context.OwinContext.Authentication.SignIn(ci);
 context.RequestCompleted();
 return Task.FromResult<object>(null);
 }

}
}

4. Receiving Token

Token is received in a redirect to the URL mentioned in “redirect_uri” parameter in request URL.So the response we get is :

http://localhost:4321/TokenReciever.html#access_token=wl8LNcbvgSF2BFMgYTn6Qt9x2cO-XTMBRBty200m_pFMsts9YW8Ydyj2I7b8ThTAZLMg6GtLuJcGOm8dl0AAxRXcOde6Jk8RPva_tqjRmR8vCbEkiUoEaJsybyjYenZkifl3mRJsEZwPTbtu0wusn_dPB1dVlFcI0-wivyVwzCQNE1vZTnJdIUA2Z5LSvzpflvl6zgSX45LbRj3uH7i58A&token_type=bearer&expires_in=1200

OAuth “Resource Owner Password Credentials Grant” flow with OWIN/Katana

Security is an essential component of any web application worth its salt. .Net has always offered many mechanisms to this end.But now we see OAuth ,the open security protocol, is being adopted very fast due to its simple and standardized approach.

Microsoft now has provided support for OAuth via OWIN/Katana.

OAuth offers many authorization flows.

Today we will cover the “Resource Owner Password Credentials Grant” http://tools.ietf.org/html/rfc6749#section-4.3

Below is a sample client request for this flow

URL: http://somesite/api/token

Header: Content-Type: application/x-www-form-urlencoded

Body: client_id=123456&grant_type=password&username=user&password=pwd

Method: POST Now on to code :

1. Required Packages

  1. Owin
  2. Microsoft.Owin
  3. Microsoft.Owin.Security
  4. Microsoft.Owin.Security.OAuth
  5. Microsoft.Owin.Host.SystemWeb

2. OWIN Startup Class

If you are not aware of the essential OWIN Startup class,please refer here http://www.asp.net/aspnet/overview/owin-and-katana/owin-startup-class-detection Below is the bare essential startup code :

using System;
using System.Collections.Generic;
using System.Linq;
using System.Web;
using Microsoft.Owin;
using Microsoft.Owin.Security.OAuth;
using Owin;

[assembly: OwinStartup(typeof(TestOAuth.StartUp))]
namespace TestOAuth
{

public class StartUp
{

public void Configuration(IAppBuilder app)
{
app.UseOAuthAuthorizationServer(new OAuthAuthorizationServerOptions
{
// the endpoint path which will be consumed via HTTP. e.g. http://website[:port]/api/token
// it should begin with a leading slash so /token is also ok but I have kept it /api/token to match my default route in Web-API
TokenEndpointPath = new PathString("/api/token"),
//Provider is a class which inherits from OAuthAuthorizationServerProvider.Will be covered next.
Provider = new CustomAuthServer(),
// mark true if you are not on https channel
AllowInsecureHttp=true
});
// indicate our intent to use bearer authentication
app.UseOAuthBearerAuthentication(new OAuthBearerAuthenticationOptions
{
AuthenticationType = "Bearer",
AuthenticationMode=Microsoft.Owin.Security.AuthenticationMode.Active

});

}
}
}

3. Provider class

As mentioned in code above,we have implemented a custom provider named as “CustomAuthServer”. The provider is where the action takes place.It has methods which authenticates the request as received by token end point and if all is well, returns the access token. Lets jump to the code (again bare essential )

using System;
using System.Collections.Generic;
using System.Linq;
using System.Web;
using Microsoft.Owin;
using Microsoft.Owin.Security.OAuth;
using Owin;

namespace TestOAuth
{
class CustomAuthServer : OAuthAuthorizationServerProvider
{
public override Task ValidateClientAuthentication(OAuthValidateClientAuthenticationContext context)
{
string clientId, clientSecret;
//gets the clientid and client secret from request body.If you are providing it in header as basic authentication then use
//context.TryGetBasicCredentials
context.TryGetFormCredentials(out clientId, out clientSecret);
// validate clientid and clientsecret. You can omit validating client secret if none is provided in your request (as in sample client request above)
if (clientId == "123456" )
context.Validated();
else
context.Rejected();
return Task.FromResult(0);

}
public override Task GrantResourceOwnerCredentials(OAuthGrantResourceOwnerCredentialsContext context)
{
//we check if the passed username and password are correct.

if (context.UserName == "user" && context.Password == "pwd")
{
System.Security.Claims.ClaimsIdentity ci = new System.Security.Claims.ClaimsIdentity("ci");
//this indicates that user is valid one and can be issued a token.
//it has several overloads ,you can take what fits for you.I have used it with ClaimsIdentity
context.Validated(ci);
}
else
{
// a custom error message can be returned to client before rejecting the request.
context.SetError("Incorrect Credentials");
context.Rejected();
}
return Task.FromResult(0);
}

public override Task TokenEndpoint(OAuthTokenEndpointContext context)
{
// This is called last in pipeline when token is about to be issued successfully.

}
}
}

The overriden methods above are the ones required for Resource Owner Password Grant Flow. For other flows,other methods are required to be overriden. We will cover other flows in later posts.

4. Receiving Token

A typical token reply is : {“access_token”:”09E5QzjmV5Tk1PNlCgCZPMMLM4SsyNnHRIxF-XbwEAnGwwlLrYjQKEyLvmDsk7-1LcdDhNzyK1SQdxkFAr3Gq2n3rJZuBfqa-svAuEeKFLqhevHX0mwuqav_7kj_rARNKPi6laph3a1VRHPWTqdI91KwdYoweLGhsMZvRG6tXPSi5jd_p-vqlrGPXp6lzl4S”, “token_type”:”bearer”, “expires_in”:1199}

This completes the flow for issuing token.

Embedding type information in JSON posted to Web-API

While the Web-API automatically  de-serializes the JSON and instantiates appropriate type ,at times we need to provide the type information along with data in posted JSON.

An example :

public void Post(IPerson person)
{
//some code
}

the definition of IPerson can be as below:

public interface IPerson
{
string name;
int age;
}

and JSON like
{
“Name”:”anyname”,
“Age”:”20″
}

the posted JSON may have necessary data for name and age but since IPerson is an abstract type Web-API cannot  de-serialize it. It needs a concrete implementations of IPerson.

To guide Web-API to our required concrete implementation we can embed type information in JSON itself.

{
“$type”:”<Fully Qualified Class Name >,<Assembly>”,
“Name”:”anyname”,
“Age”:”20″
}

It is important that “$type” should be first element else it will not be correctly parsed as the  JSON Media-Type formatter for Web-API (Json.Net) parses forward only.